10 Enchanting DIY Fairy Garden Ideas for Kids to Enjoy
Are you ready to spark your child’s imagination? In this blog, I’ll share 10 enchanting DIY fairy garden ideas that kids will love! From whimsical flower pots to magical underwater themes, there’s something for every young gardener. These projects not only inspire creativity but also provide a fun way to learn about nature. Let’s get started on grand adventures that you and your kids will cherish together!
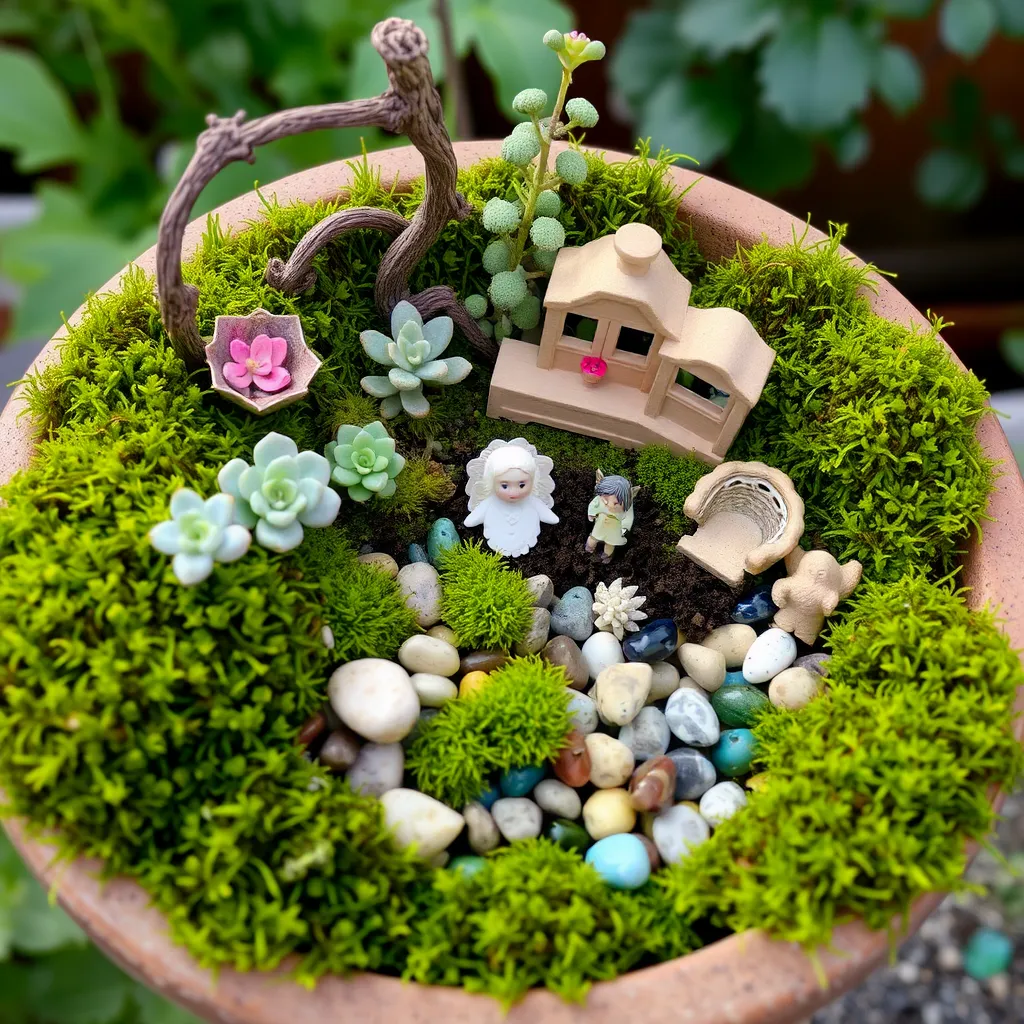
Miniature Fairy Garden in a Flower Pot: Step-by-step guide and materials needed

To make a miniature fairy garden in a flower pot, follow these steps. First, gather your supplies. You will need:
– A small flower pot
– Potting soil
– Small plants (like succulents or moss)
– Miniature fairy figures
– Pebbles or small stones
– Decorative items (like tiny furniture or shells)
Next, fill the flower pot with potting soil. Leave some space at the top. Then, plant your small plants. You can use one kind or mix different plants for texture.
Now it’s time to add fairy figures. Place them among the plants. This gives your garden life and charm. Use pebbles to create paths or borders. It makes the garden look neat and tidy.
Finally, add the decorative items. Shells, tiny furniture, or colorful stones can make it special. Let your kids help pick and arrange the pieces. This garden will be a fun spot for their imagination!
Magical Woodland Fairy Garden: Creative ideas for natural elements and features

A magical woodland fairy garden is all about nature. Start by picking a spot in your yard or on a table. You want a place that feels like a hidden forest. Use natural elements like twigs, leaves, and stones to create a cozy space.
First, gather your materials:
– Twigs and branches
– Leaves or soft moss
– Small stones
– Miniature fairy figures
– Wildflowers or herbs
Begin by laying down a base with the twigs. Create a frame or a fence. Use leaves or moss as the garden floor. This adds softness and color.
Next, place your miniature fairy figures among the stones. They can sit on rocks or hide behind leaves. Add wildflowers or herbs for pops of color. These plants attract real butterflies, adding more magic!
Encourage your kids to use their creativity. Let them arrange the elements in their way. They can make a tiny path or a secret hideout for fairies. This garden will spark their imagination!
Underwater Fairy Garden: Instructions for making a unique garden with aquatic themes

An underwater fairy garden is a unique twist. It brings the magic of the ocean to your home. Start with a clear container, like a fish tank or glass bowl. This will be your garden base.
You will need these materials:
– A clear container
– Sand or colored stones
– Small aquatic plants (like water lilies)
– Miniature sea creatures or fairy figures
– Decorative shells
First, layer sand or colored stones at the bottom of the container. This creates a beachy look. Next, add the small aquatic plants. They will bring life to your garden.
Place miniature sea creatures or fairy figures around the plants. You can use shells to decorate the edges. This adds a fun and colorful touch.
Encourage kids to be creative. Let them design the layout and choose the figures. They can even create stories about their underwater fairies. This garden will be a delightful escape for their imaginations!
Fairy Garden with Recycled Materials: How to repurpose items for a whimsical effect

You can make a fairy garden using recycled materials. Look around your home for items to use. Old jars, broken pots, and bottle caps work great. Your kids can help you gather these things. They will enjoy finding treasures to use.
Start with a container. Choose something like a tin can or a wooden box. Clean it out well. Next, add soil to the bottom. Use small rocks to help drainage. This keeps the plants healthy.
Now, use the recycled items to build features. Turn a jar into a fairy house. Paint it bright colors to make it pop. You can cut a door and windows. Use bottle caps as stepping stones. They add charm to your garden.
Add plants like moss or tiny flowers. These plants look magical. They also give your fairies a cozy home. Be creative and let your kids pick their favorite colors. This makes the garden special.
Lastly, don’t forget to add little figures. You can find tiny fairies, animals, or gnomes at craft stores. Let your kids arrange them how they like. This gives them a sense of ownership.
Enchanted Stone Fairy Garden: Tips on using stones and pebbles in your design

Using stones and pebbles can make your fairy garden feel enchanted. Start by collecting different types of stones. Look for smooth, colorful pebbles. You want a mix of sizes and shapes.
Create pathways using the stones. Lay them out in a fun design. Your kids can help place each stone. This gives your garden a magical look.
Use larger stones as natural seating. They can be seats for the fairies. You can stack some smaller stones to make a tower. This adds height and interest to the garden.
Incorporate tiny plants around the stones. Use ground cover plants that stay small. This makes the garden feel lush and green. Kids can help pick out plants that fit well.
Finally, let your kids paint some stones. They can use bright colors to create little signs. Write fun names like “Fairy Land” or “Gnome Village.” This personal touch makes the garden unique.
Seasonal Fairy Garden Ideas: How to adapt your garden for different seasons

Changing your fairy garden with the seasons is fun. You can switch out decorations to match the time of year.
In spring, add pastel colors. Use flowers like daisies or tulips. Your kids can help plant seeds. They will love seeing them grow.
Summer brings bright colors and fun items. Add tiny beach chairs and umbrellas. Place small seashells around the garden. This gives the fairies a summer getaway.
When fall comes, add leaves and pumpkins. Use orange and yellow colors. Kids can collect leaves to decorate. They can also paint small pumpkins.
In winter, use fake snow or cotton balls. This creates a winter wonderland. Add tiny snowmen made from stones. Kids can make little holiday decorations too.
These seasonal changes let your kids be creative. They can adapt the garden to show their favorite times of the year.
DIY Fairy Garden Accessories: Crafting Tiny Furniture and Decorations with Kids

You can make tiny furniture with your kids for the fairy garden. Gather some supplies first. Use small sticks, twigs, and pebbles. Scissors, glue, and paint will help too.
Start by making a miniature chair. Cut a twig into four short pieces. These pieces will be the legs. Use longer twigs for the seat. Glue the pieces together. Let your kids paint it in bright colors.
Next, create a table. Use a flat stone as the top. Attach small sticks as the legs. Your kids can add tiny flowers on the table. This makes it look more alive.
Don’t forget decorations! Use acorns or small shells as garden ornaments. You can even make little signs. Write fun names for the fairy garden. This adds a personal touch.
Kids will love making these accessories. It sparks their creativity. Plus, it helps them feel proud of their work. Watch their eyes light up when they see their fairy garden come to life!
Tips for Involving Kids in DIY Projects

Involving kids in DIY projects boosts their creativity and joy. Start by letting them choose a theme. This way, they feel in charge. Ask them what colors they like. Use their choices to make the garden special.
Next, assign simple tasks. Kids can paint pots or gather materials. Small hands love to help! Show them how to measure soil or arrange plants. This hands-on work teaches them skills.
Make it a game. You can have a race to see who finds the best rocks. Or, create a scavenger hunt for tiny fairy items. Kids learn while having fun.
Encourage storytelling. Ask them to create stories about their fairy garden. This sparks their imagination. It makes the project more meaningful.
Finally, celebrate their work. Take photos once the garden is complete. Share these photos with family and friends. Kids love to show off their creations. This builds pride in their efforts.
Maintaining a Fairy Garden

Caring for a fairy garden helps it stay lovely. Water the plants regularly. Check the soil; it should be damp but not soggy. Remove any dead leaves or flowers. This keeps the garden neat and healthy.
Keep an eye on the sunlight. Most fairy gardens need bright light. If plants look sad, they might need more sun. Move the garden to a sunnier spot if needed.
Check for pests. Small bugs can hurt plants. Use gentle soap and water to clean leaves if you see them. This keeps your fairy garden safe and happy.
Change decorations with the seasons. Add small pumpkins in fall or snowflakes in winter. This keeps the garden fresh and fun all year round.
Photos and Inspiration

For great ideas, look online for fairy garden photos. Websites like Pinterest and Instagram have tons of examples. You can see how others design their gardens.
YouTube also has videos showing how to build fairy gardens. Watch these guides for step-by-step help. You might find new materials or themes you love.
Don’t forget to take your own photos! Capture each stage of your garden’s growth. This makes a lovely keepsake to enjoy later. Sharing your photos can inspire other kids, too.
Conclusion
Creating a fairy garden can be fun and simple. We explored different themes, like woodland magic and underwater worlds. You learned how to use recycled materials and stones for unique designs. Seasonal changes can keep your garden fresh, too. Crafting accessories with kids makes it all even more special. Remember to care for your garden to enjoy its charm for years. With these ideas, you can bring magic to your backyard! Dive in and let your creativity shine!